
Operation Panel
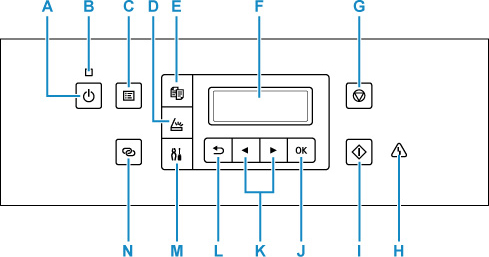
- A: ON button
-
Turns the power on or off. Before turning on the power, make sure that the document cover is closed.
- B: ON lamp
- Lights after flashing when the power is turned on.
- C: MENU button
- Displays the Copy menu, or Scan menu screen.
- D: SCAN button
- Switches the printer to the scan mode.
- E: COPY button
- Switches the printer to the copy mode.
- F: LCD (Liquid Crystal Display)
- Displays messages, menu items, and the operational status.
- G: Stop button
- Cancels operation when print, copy, or scan job is in progress.
- H: Alarm lamp
- Lights or flashes when an error occurs.
- I: Start button
- Start copying, scanning, etc.
- J: OK button
- Finalizes the selection of a menu or setting item. This button is also used to resolve an error or ejects documents in the ADF (Auto Document Feeder).
- K:
 and
and  buttons
 -
Used to select a setting item. These buttons are also used for entering characters.
- L: Back button
- Returns the LCD to the previous screen.
- M: Setup button
- Displays the Setup menu screen. With this menu, you can perform printer maintenance and change printer settings. Also used for selecting the input mode.
- N: Wireless connect button
- To set wireless router information in the printer directly from a smartphone or other such device (without having to do any procedures at the router), hold down this button.
